
What are you having for dinner tonight? Chances are, it’s chicken. According to the USDA, chicken is the number one protein consumed by Americans. We eat this little bird grilled, sautéed, deep-fried, roasted, poached, skewered, in a sandwich, and in salads. And what’s not to love? Chicken is lean, inexpensive, readily available, and packed with protein.
Grilled Chicken pull temp: 155°F
Since chicken is eaten so frequently in the U.S., you’ve probably had had at least one experience with it that was, well, less than stellar. Have you had chicken that you could barely chew? Dry meat that left your mouth feeling like a desert? Or a terrifying bite that made you realize the center of the chicken breast was still pink and soft? We all have. So how can you be sure your chicken is done and safe to eat every time and still guaranteed it’ll be juicy and delicious? The keys are time and temperature. To demonstrate these principles, we cooked some chicken breasts in the style of Simply Recipes’ Tandoori Chicken. Read on to learn more.
Chicken doneness temperature
Chicken is not a meat that can be prepared medium rare. To kill the ever-present salmonella bacteria that inhabit chicken, it must be pasteurized by cooking. The standard temperature for pasteurization is 165°F (74°C), the temperature at which salmonella is killed almost instantly. But cooking chicken to that temperature actually overcooks it. What are we to do?
This is where time comes into play. Pasteurization is a function of both time and temperature. While salmonella is killed almost instantly at 165°F (74°C), it also killed at 155°F (68°C) if it is allowed to maintain that temperature for 54.4 seconds. This means we can cook our chicken to a slightly lower temperature to achieve chicken that is more tender and juicy, while still being fully cooked.
Most of us are guilty of overcooking chicken because we fear undercooking and serving helpings of food poisoning for dinner. With a few simple steps and the right tools, you can prepare perfect chicken every time.
The Three Keys to Grilling Chicken Breasts
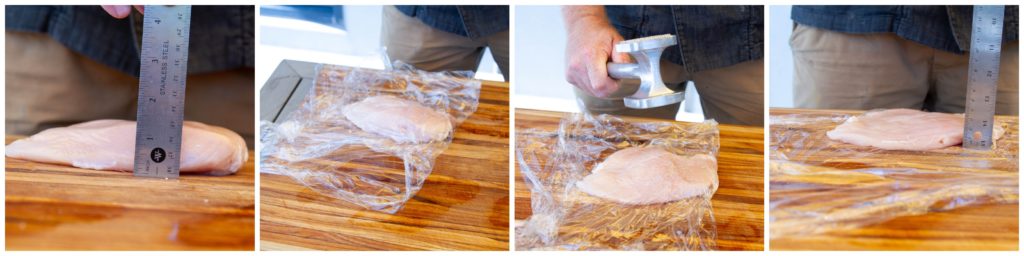
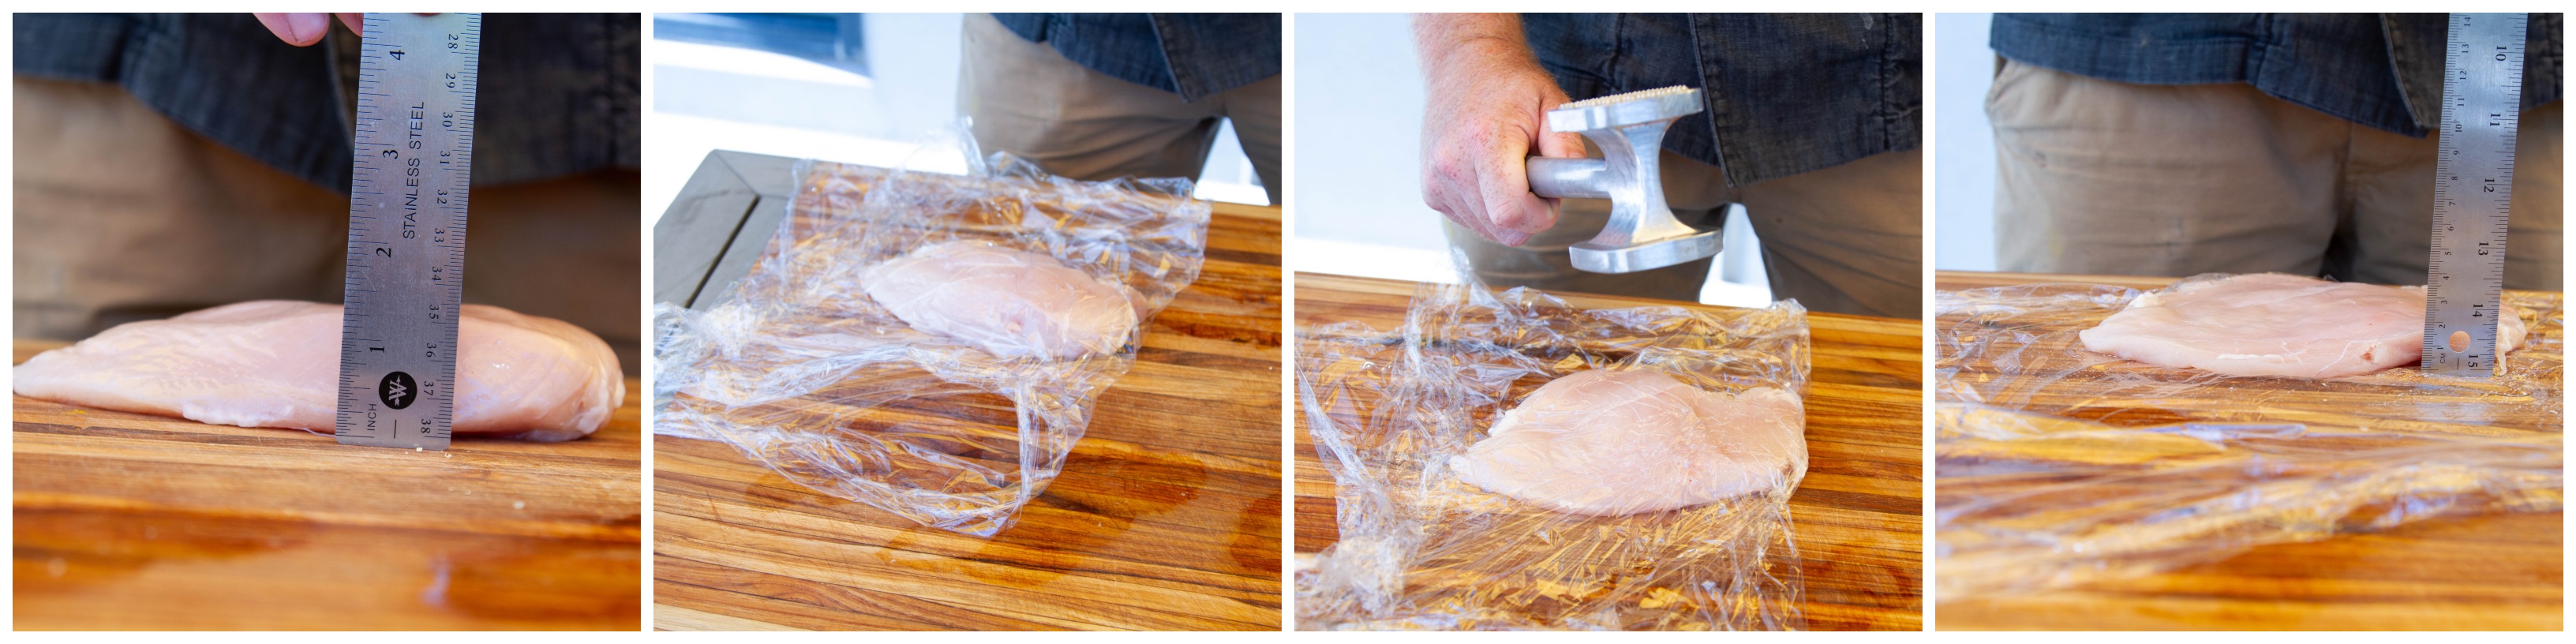
Key 1: Pound Your Chicken
One of the keys to moist juicy chicken breasts is to pound the breasts flat before cooking. People often think of boneless, skinless breasts as ready to cook, but, when it comes to grilling, that’s just not true. A chicken breast is a thermal-gradient nightmare! Look at this illustration of the thermal gradients in an un-pounded chicken breast. The thick part will be much cooler in the center than the thin bit at the end. By the time the center is up to temperature, the edges will be super dry.


In tests we have conducted in the past, we measured the gradients within chicken breasts by measuring temps at different locations. We found that in unflattened breasts, the temperature swing from center to edge could be as wide as 53°F (29°C). However, flattening out the chicken also flattens out the gradients: by pounding out the chicken breasts to a relatively even thickness, that gradient was pushed down to 19°F (11°C). The more even the thickness of the meat, the more uniform the heat transfer rate will be, and the result is a more homogeneous final temperature.
Kenji with seriouseats.com has explained how flattening chicken breasts yields a superior finished product:
- Even Cooking: With an even, uniform thickness, the meat will cook more uniformly and the different sections of meat will come up to temperature more closely at the same time. You’ll avoid overcooked edges that have contracted, and squeezed out moisture.
- Faster Cooking: You can reduce cooking time considerably by getting rid of the bulky end of the meat. The heat doesn’t have to travel through as much mass on either side to bring the center up to temperature. We found that flattened chicken cooked faster than the thicker meat by about 4 minutes.
- Moister Meat: With less mass for heat to travel through, and more even cooking with a gentler temperature gradient throughout, less moisture will be expelled from the protein fibers, leaving you with uniformly moist chicken.
- Tenderizing: Pounding loosens up the bundles of protein fibers and makes the meat more tender.
Key 2: Use a Thermapen
A Thermapen® ONE is essential in finding the lowest temperature in the meat. (Meat is only as cooked as its lowest temperature!) Visually gauging the thickest part of the meat won’t necessarily give you the thermal center where that lowest point will be. The ability to take the temperature quickly in several places will help you know if your chicken is cooked safely and properly. If you’re doing a lower, slower cook, a leave-in probe thermometer like the ChefAlarm® can be used to track the temperature, but you will still need a Thermapen to check the thermal center to ensure safety.
Key 3: The Perfect Pull Temp for Grilled Chicken
As we mentioned above, chicken must be thoroughly cooked to be safe to eat. Given the fact that time and temperature will affect the safety of the chicken, we recommend pulling the meat at 155°F (68°C) and then tenting it with foil to maintain temperature for a few minutes. If that sounds scary to you, then think of this: chicken becomes safe to eat at 155°F (68°C) after about 55 seconds, so tenting it to maintain temperature for a minute will get you to safety; but there will also be carryover cooking in the breasts, with the thermal gradients equalizing over the thickness of the meat. So your 155°F (68°C) chicken will end up a lot closer to the “safe” temp of 165°F (74°C). A 5–7°F (3-4°C) rise in temperature can be expected if the meat is kept from cooling too quickly—hence the tenting with foil.
Grill setup for chicken breasts
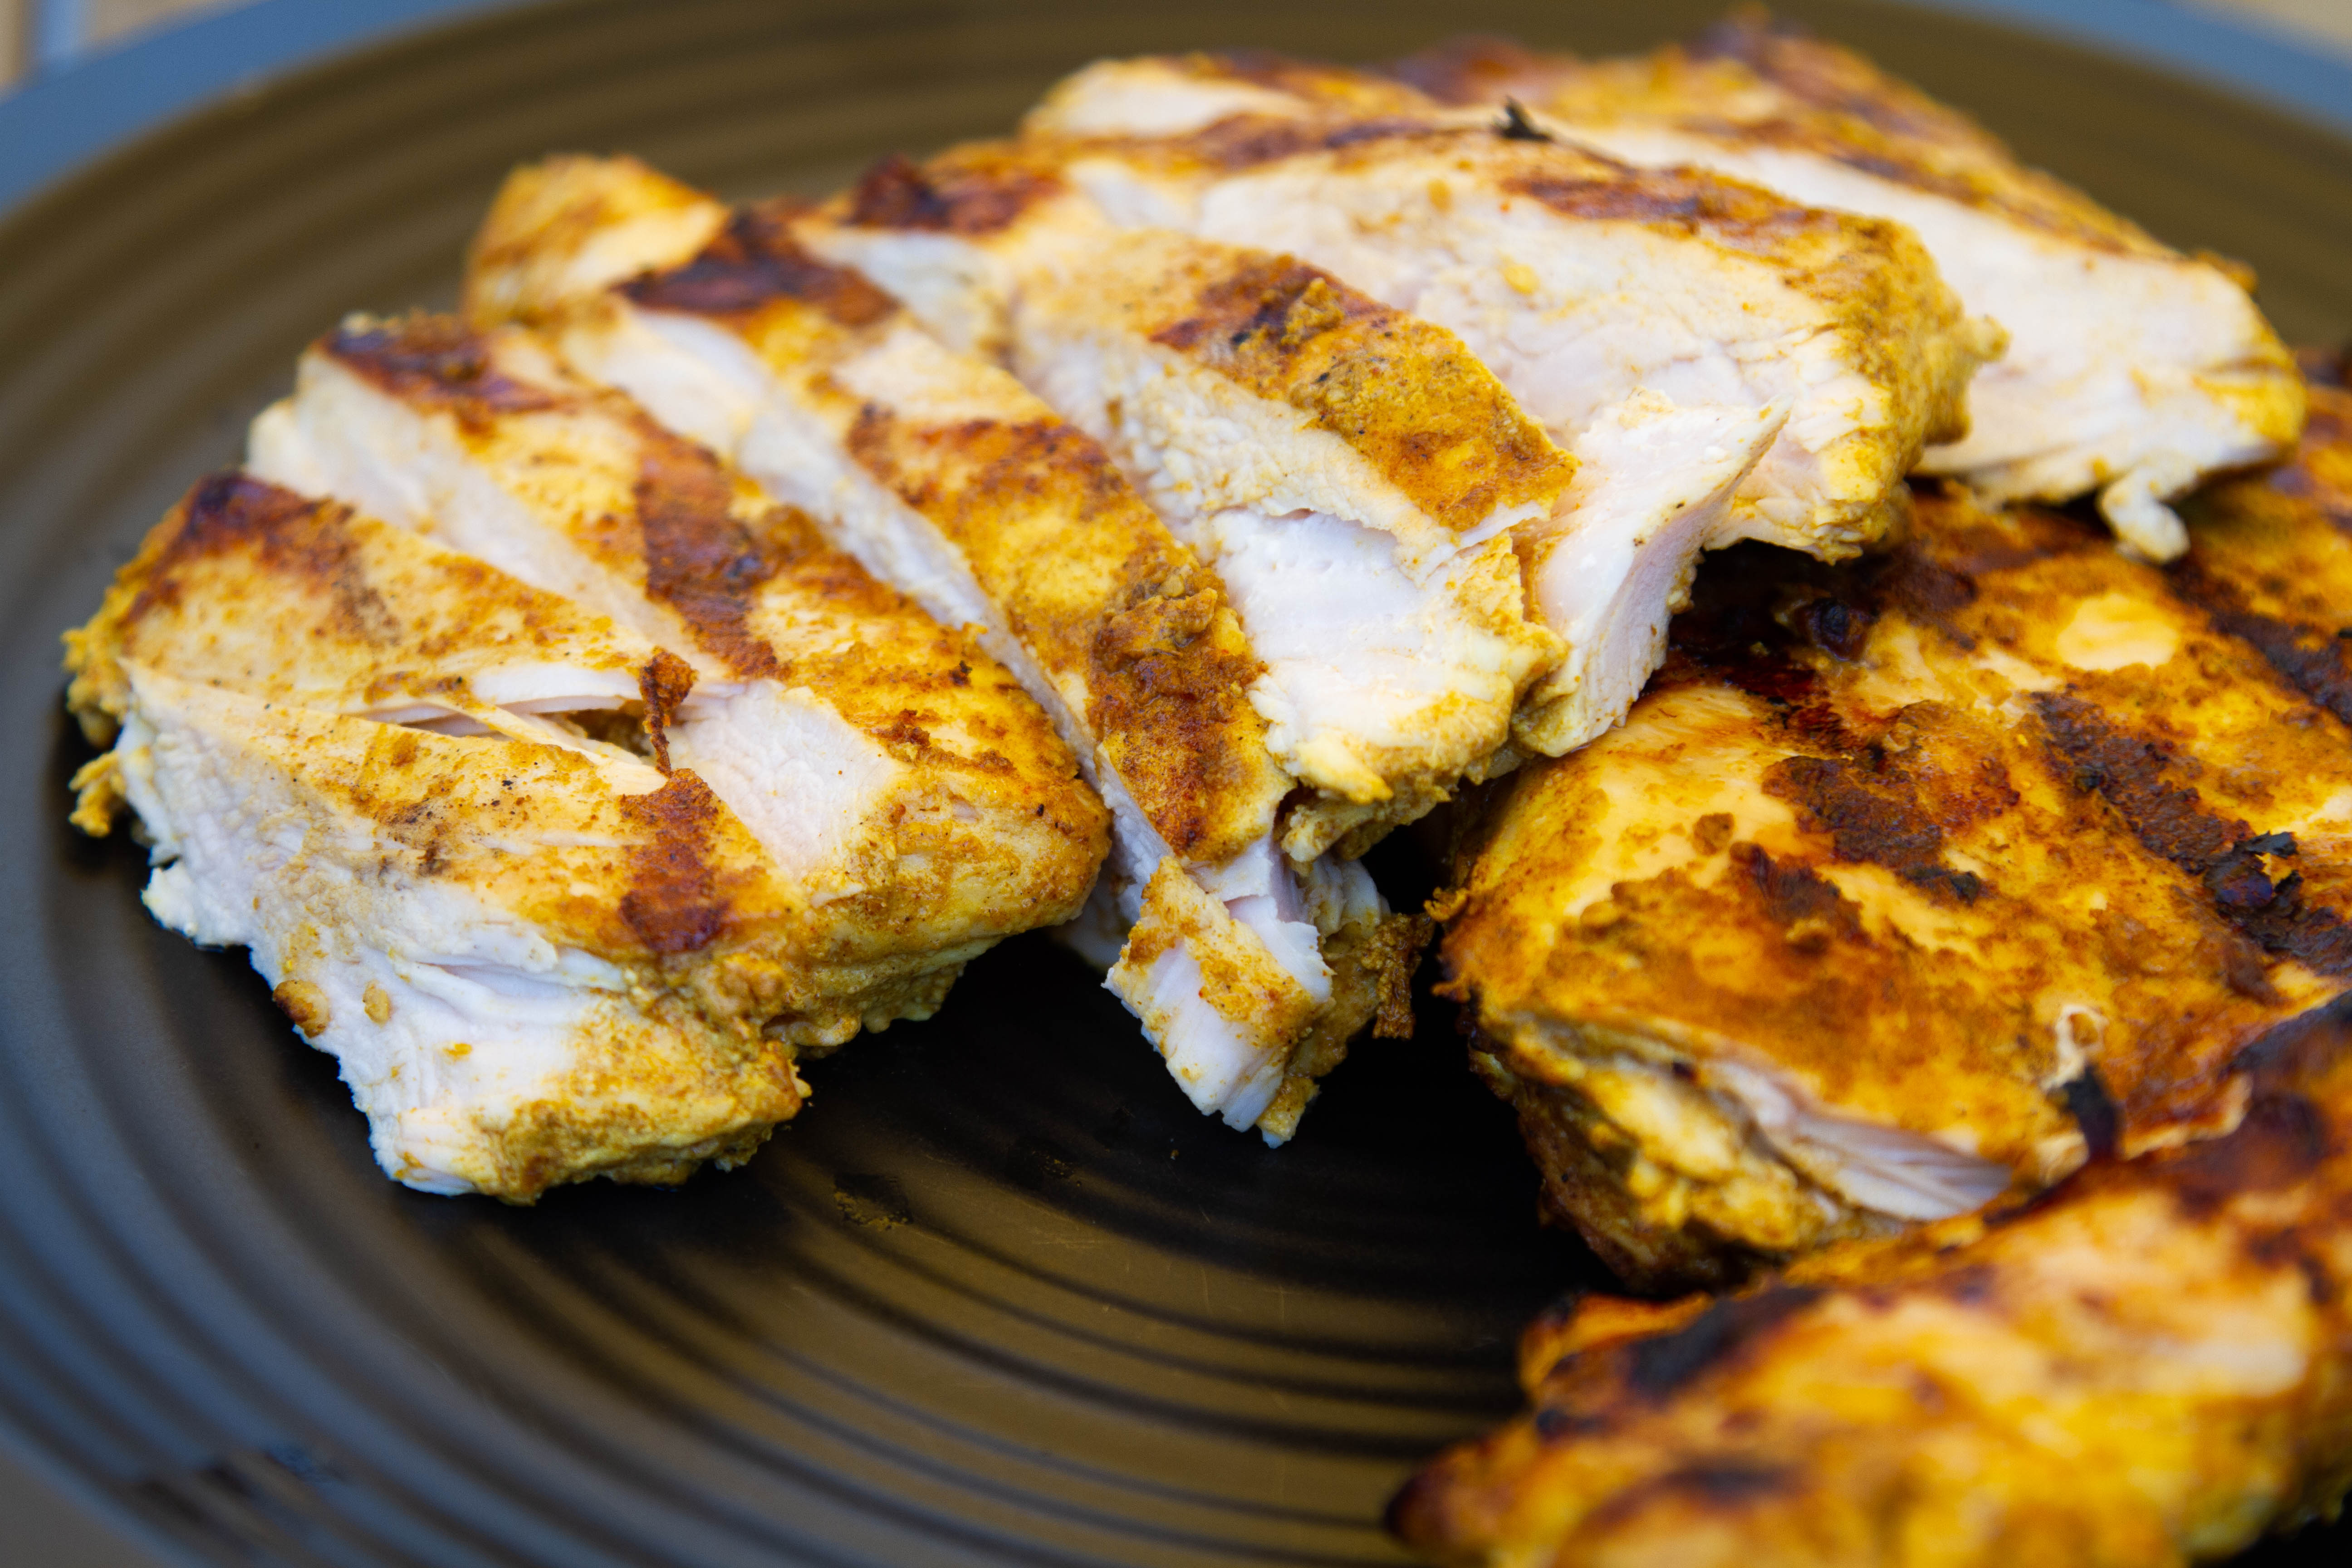
When you think of grilled chicken breasts, you probably think of those gorgeous grill marks on the surface. Those come from Maillard reactions that combine natural sugars and amino acids in fun, new ways. To get those lines, you need high heat on the surface, so we started the grill on high, and then lowered the temperature slightly to a medium-high just before we put the chicken on. Turning the chicken frequently helps avoid overcooking one side while the meat comes up to the target temperature (as documented by Kenji at seriouseats.com in his How to Grill Boneless Skinless Chicken Breast), but it can be hard to do with a thick-coated marinade like the one we use below.
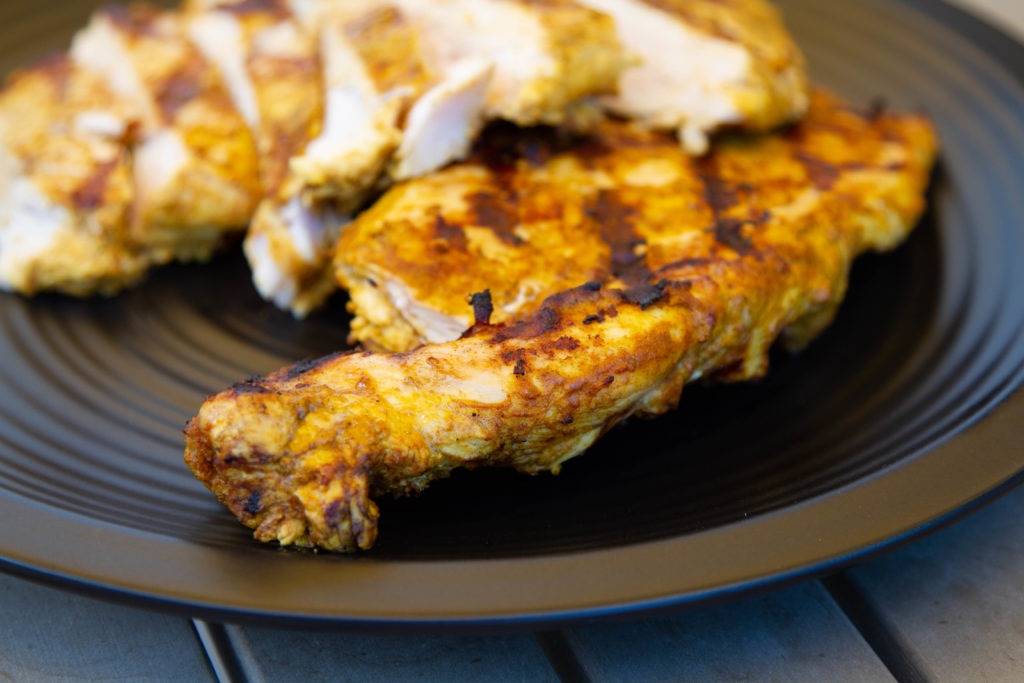
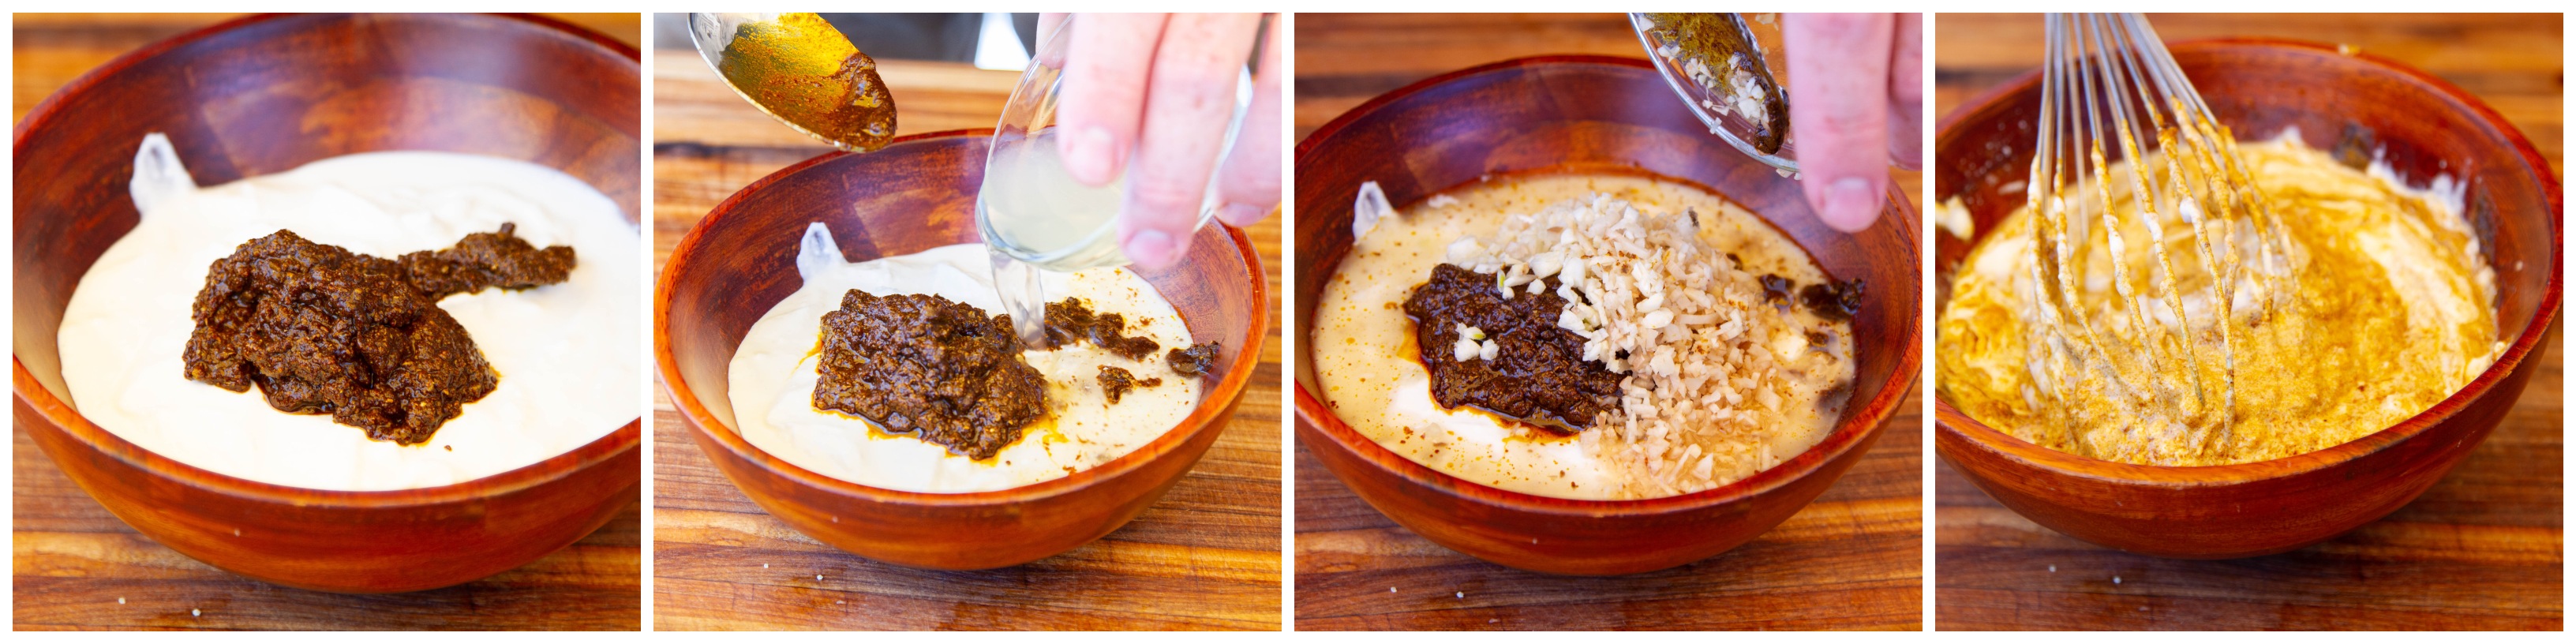
Tandoori-style grilled chicken breast recipe
Based on Tandoori Chicken by Simply Recipes
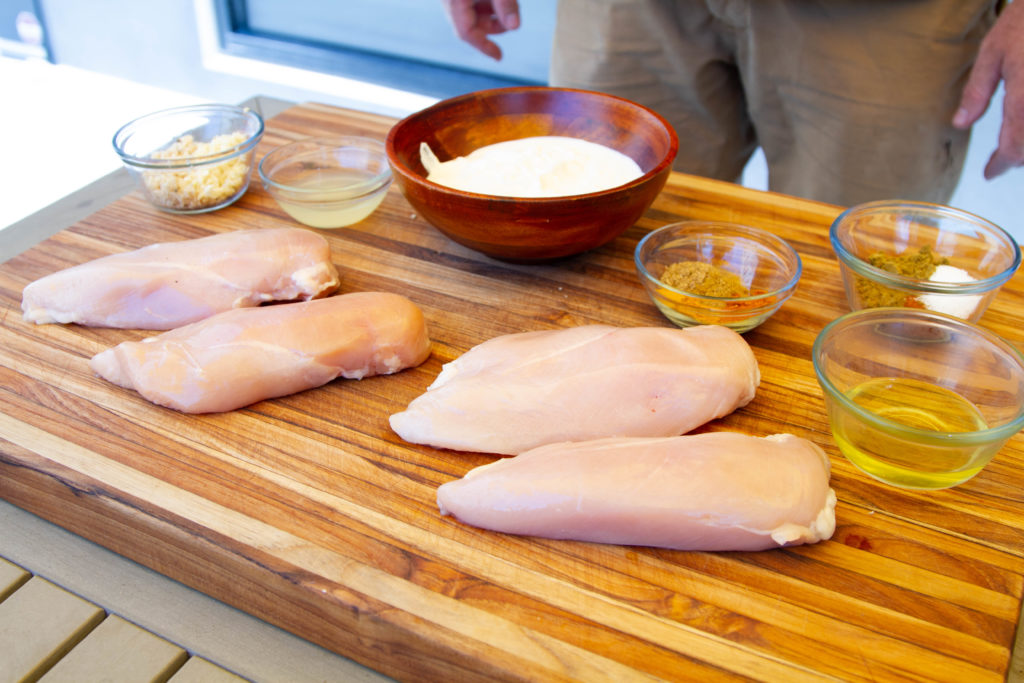
Ingredients
- 3 Tbsp vegetable oil
- 1 tsp ground coriander
- 1 tsp ground cumin
- 1 tsp ground turmeric
- 1 tsp cayenne
- 1 Tbsp garam masala
- 1 Tbsp sweet (not hot) paprika
- 1 cup plain yogurt (can sub buttermilk)
- 2 Tbsp lemon juice
- 4 minced garlic cloves
- 2 Tbsp minced fresh ginger
- 1 tsp salt
- 4 boneless, skinless chicken breasts

Instructions
- Between sheets of plastic wrap, pound out chicken breasts to that they have an even thickness, about 1/2″.
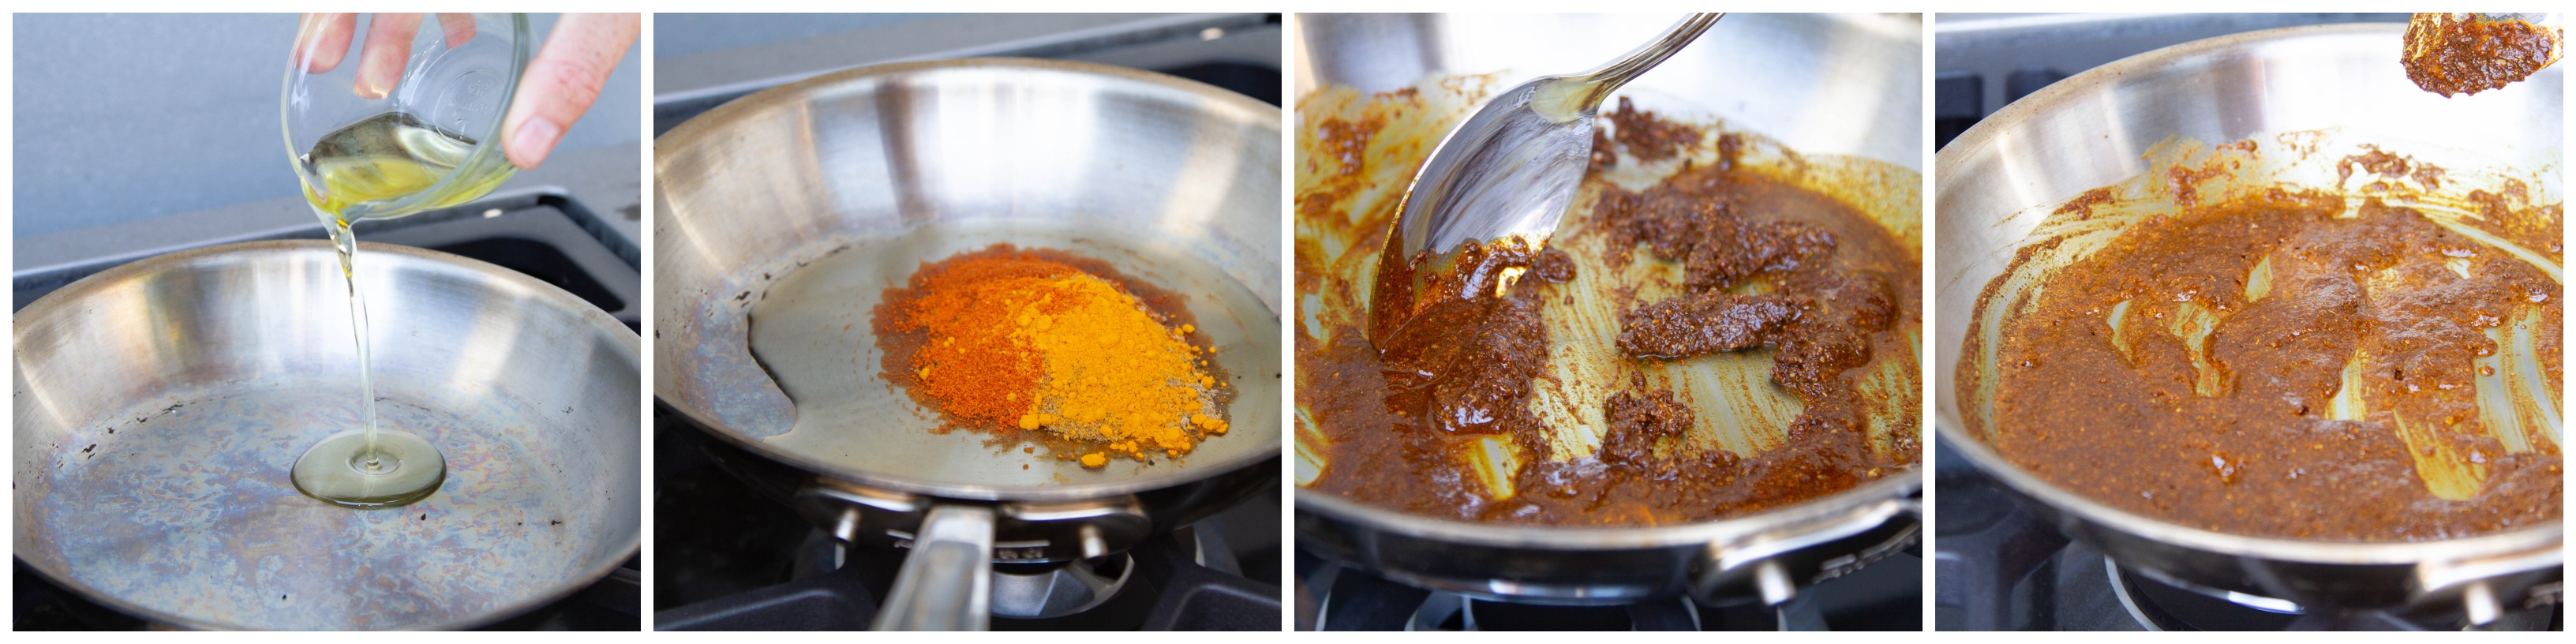
- Heat the oil in a small pan over medium-high heat.
- Add the dried spices to the hot oil and cook until they become quite fragrant and sizzle some. Remove from heat.
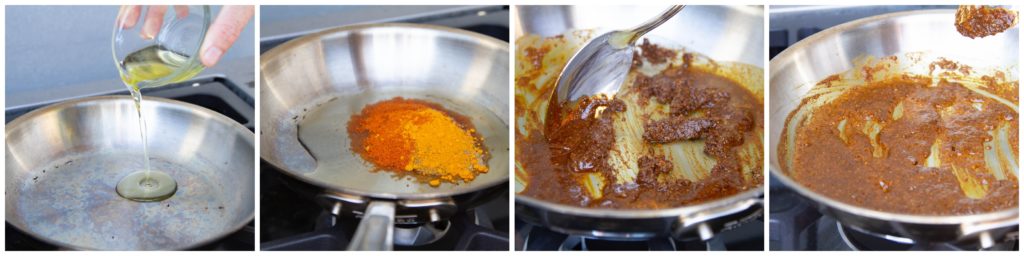
- Let the spice paste cool and them mix with the yogurt, lemon juice, salt, garlic, and ginger.

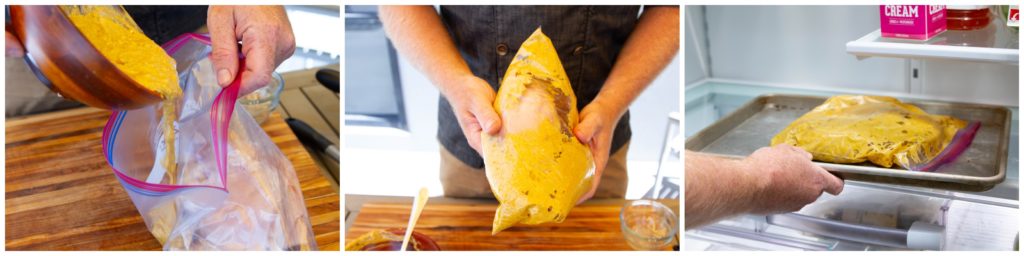
- Place the chicken breasts in a gallon-size zipper bag or a bowl, coat with marinade.
- Refrigerate chicken in the marinade for at least an hour, but no more than 8 hours.
- When you are ready to cook, heat your grill to high heat.
- Before placing the chicken on the grill, lower the heat slightly.
- Oil the grill grates well.
- Remove the chicken from the marinade, shaking off excess.
- Place the chicken on the grill, directly over the heat source.
- After a few minutes, turn the chicken and allow to continue cooking.
- Monitor the temperature every minute or so with your Thermapen®.
- Turn the chicken from time to time to achieve browning/grill marks as you can.
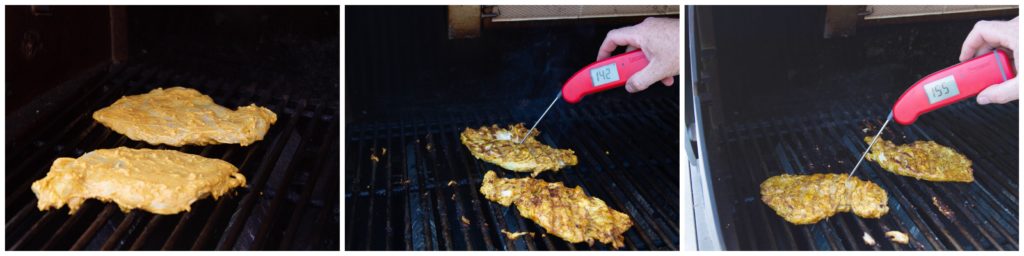
- When the lowest temperature in the chicken breast reaches 155°F (68°C), remove the chicken from heat and tent with foil for at least 1 minute.
- Serve the chicken: as an entree, sliced on a salad, as a delicious sandwich. Let your imagination run wild.


This Indian-style recipe is a great way to practice grilling chicken breasts with thermal know-how. Hopefully, you’ve found a tip here you haven’t tried before that will help you make better chicken! It really is amazing how much you can improve your cooking, and how easy it can be, when you’re armed with the knowledge that a Thermapen® can give you of what’s happening in your food.


0 comments